Joinery · 16 min read · 30 May 2026
Custom kitchen cabinets in the UAE: layout, materials and fitting
How a custom kitchen is planned: layouts and aisles, the work triangle, landing space, boards for a wet room, soft-close hardware, lighting and an itemised BOQ.

By Ali Haider Basra, Founder, Al Tareeq Decor · Contact our workshop
Key takeaways
- Choose the appliances and mark the water, waste, gas and sockets before the drawing; the cabinets are cut around them.
- Keep an aisle of 107 cm where one person cooks (122 cm for two) and a walkway of 91 cm where people only pass.
- Work triangle legs of 122–274 cm, 790 cm in all, with landing counter beside the sink, hob and fridge.
- A kitchen is a wet room: ask for a moisture-resistant core, sealed edges at the sink and a named board grade on the quotation.
- Our kitchens are priced as an itemised BOQ after a free site visit; the worktop, appliances and plumbing are marked in or out of scope line by line.
On this page
- Key takeaways
- What custom kitchen cabinets are, and what we build
- Choose the appliances and mark the service points first
- Pick the layout from the room: single run, galley, L, U or island
- Kitchen layouts at a glance
- The work triangle: draw it, then measure it
- Landing space: where the cooking actually happens
- Space to leave beside each fixture
- Boards for the box and the doors in a wet room
- Where a kitchen takes in water
- Handleless fronts, soft-close and the hardware that does the work
- Worktops, splashbacks and the sink unit
- Lighting a kitchen: under the wall units, the plinth and the ceiling
- Measuring, drawing and fitting: the order of work
- From first visit to a working kitchen
- What a kitchen BOQ lists, and what moves the price
- Common questions
What custom kitchen cabinets are, and what we build
A custom kitchen is a set of cabinets drawn for one room. The units are cut to the true length of each wall, so no gap is closed with a loose panel, the tall units can reach the ceiling and every drawer is sized for what goes in it. Ranges bought off a shelf are made in set widths and heights. They arrive fast, but filler strips close the gaps along the wall and the space above the top cabinets stays wasted.
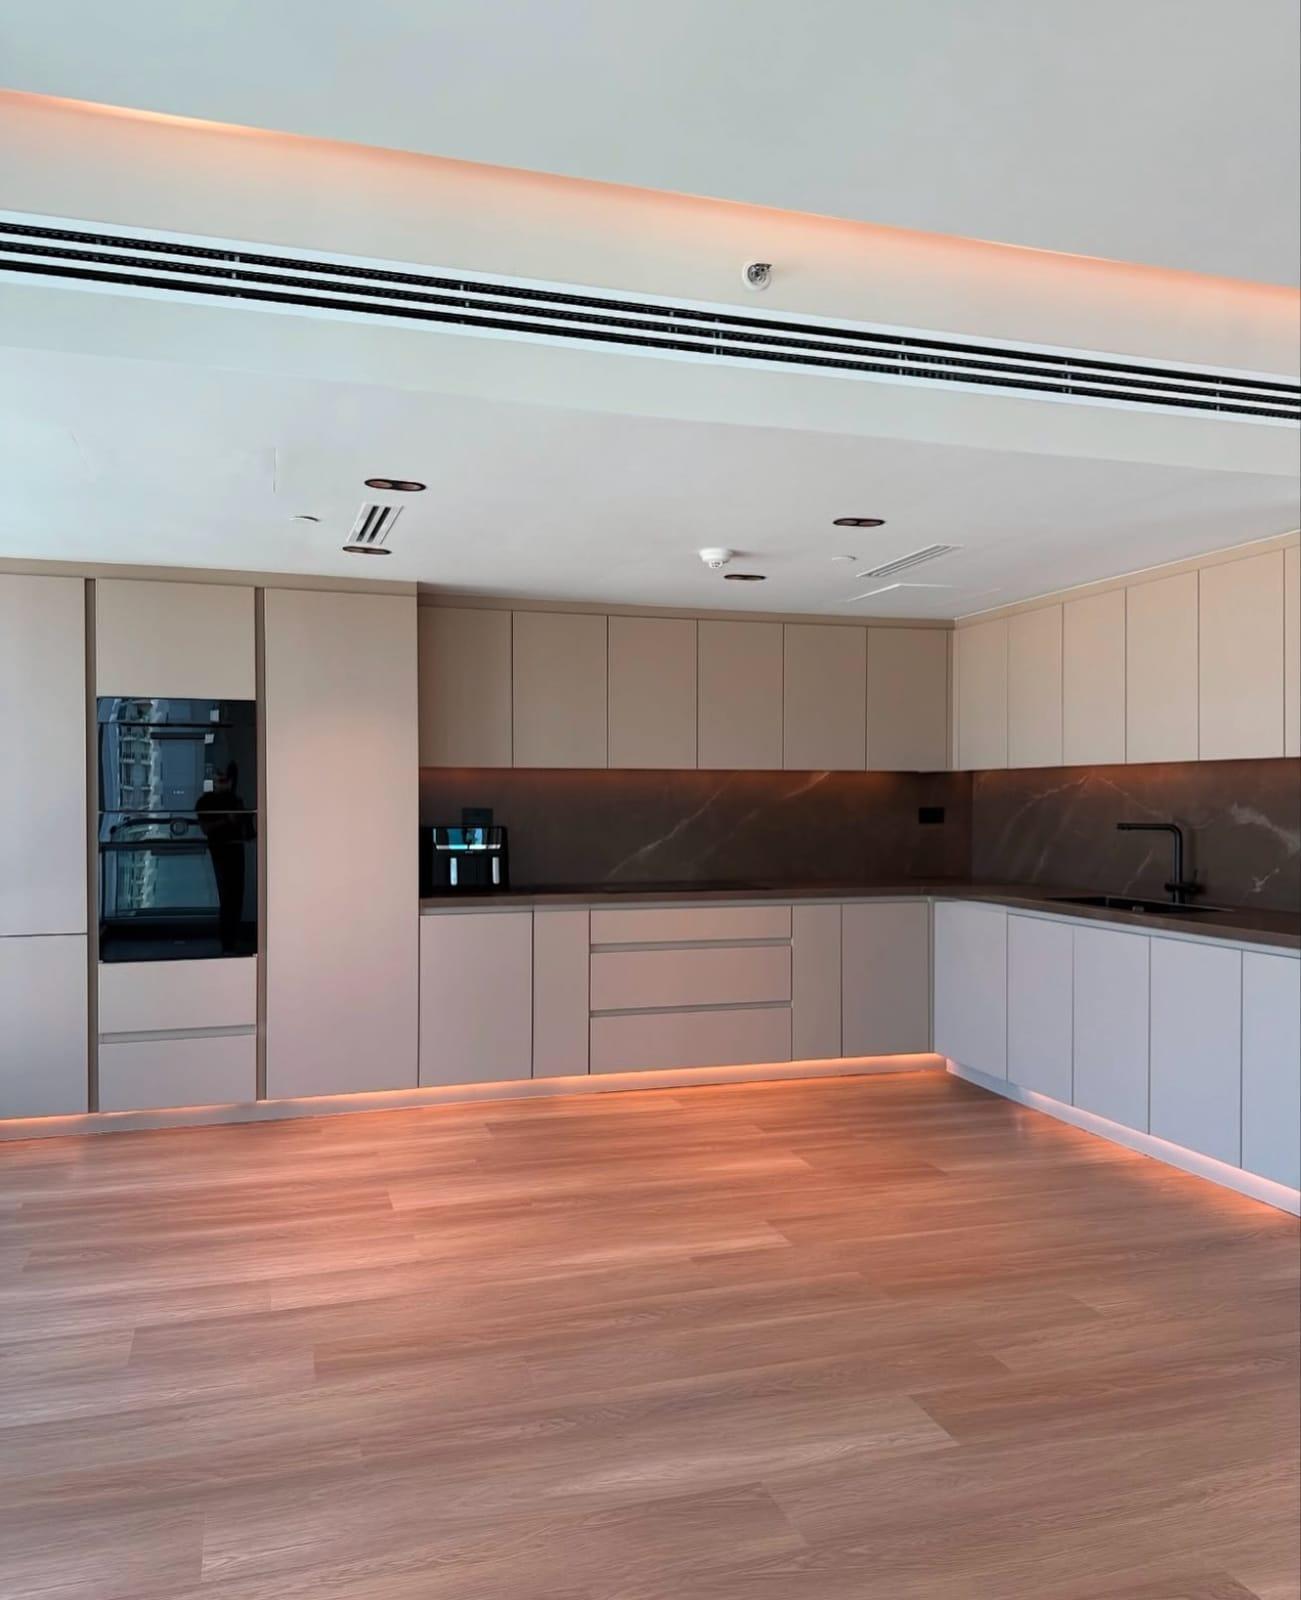
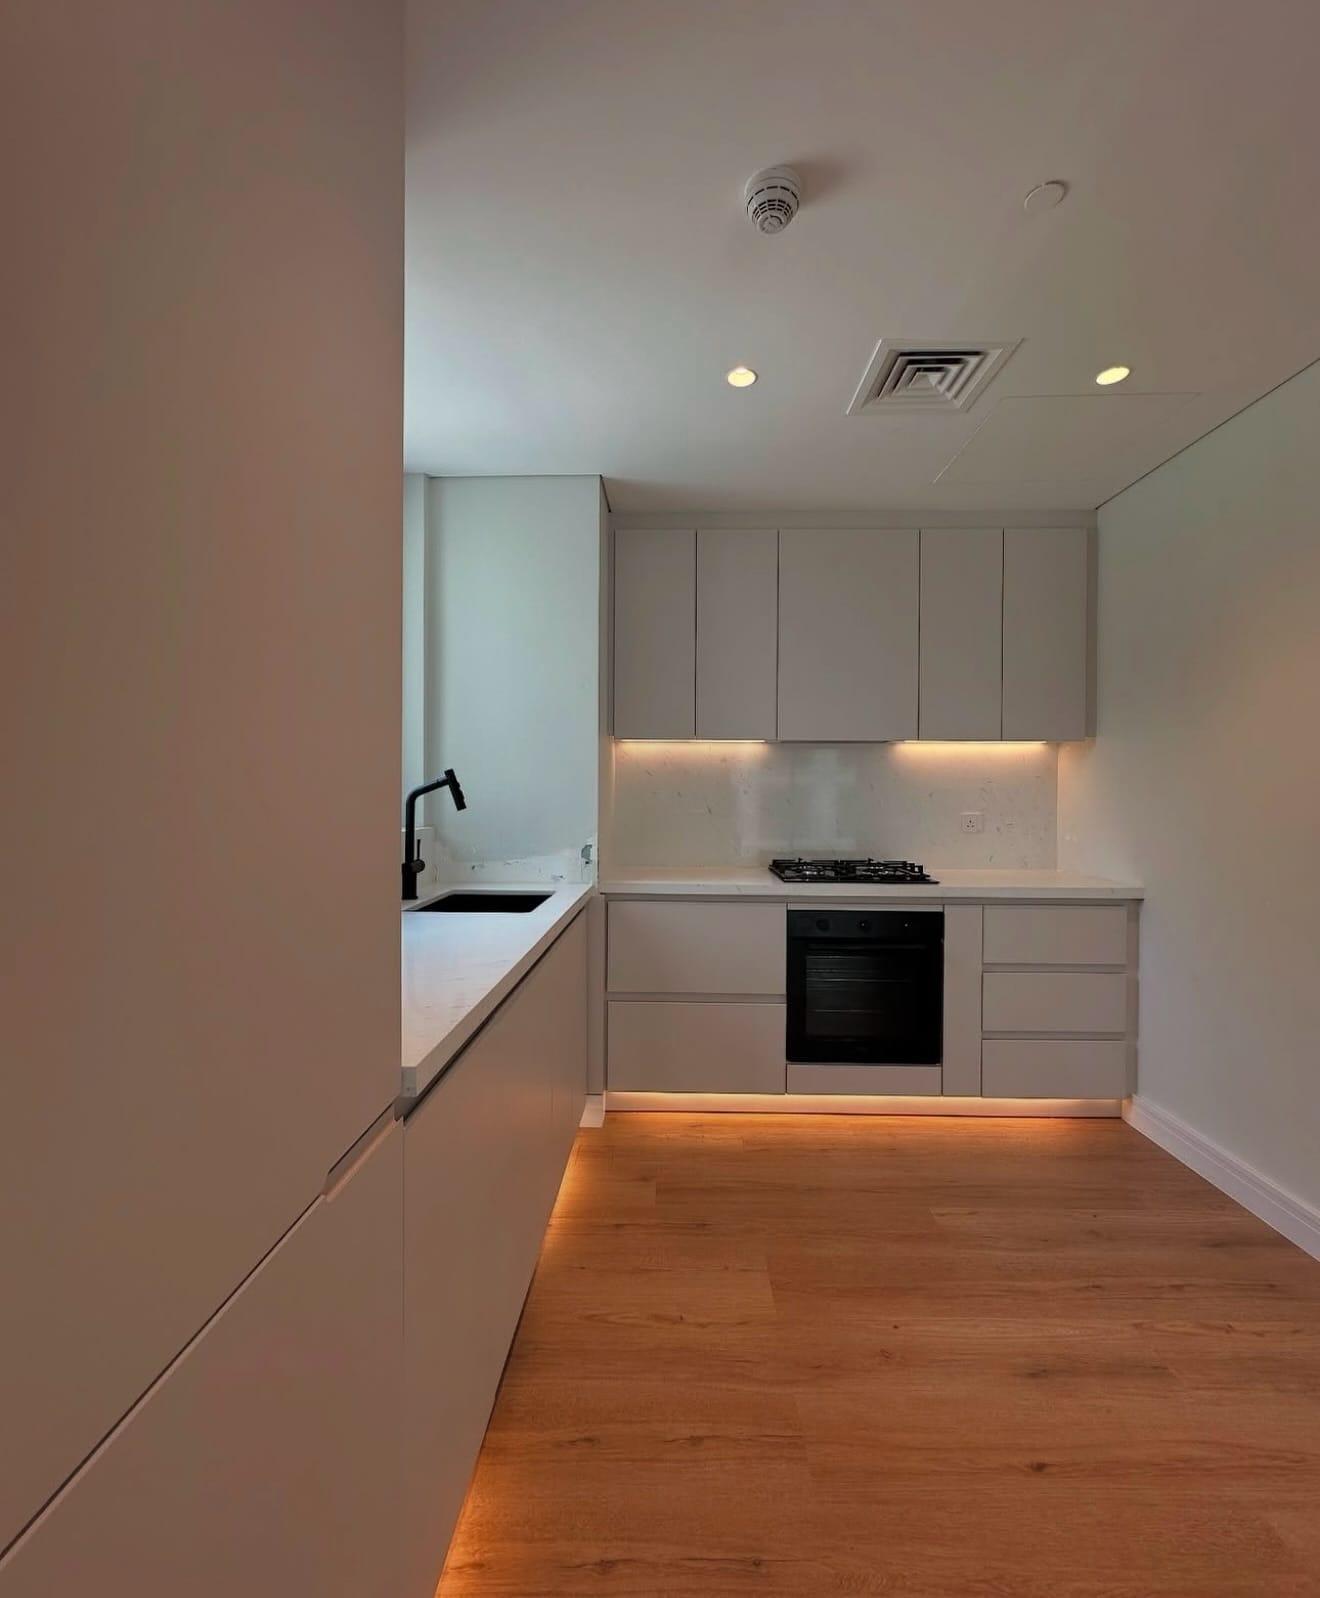
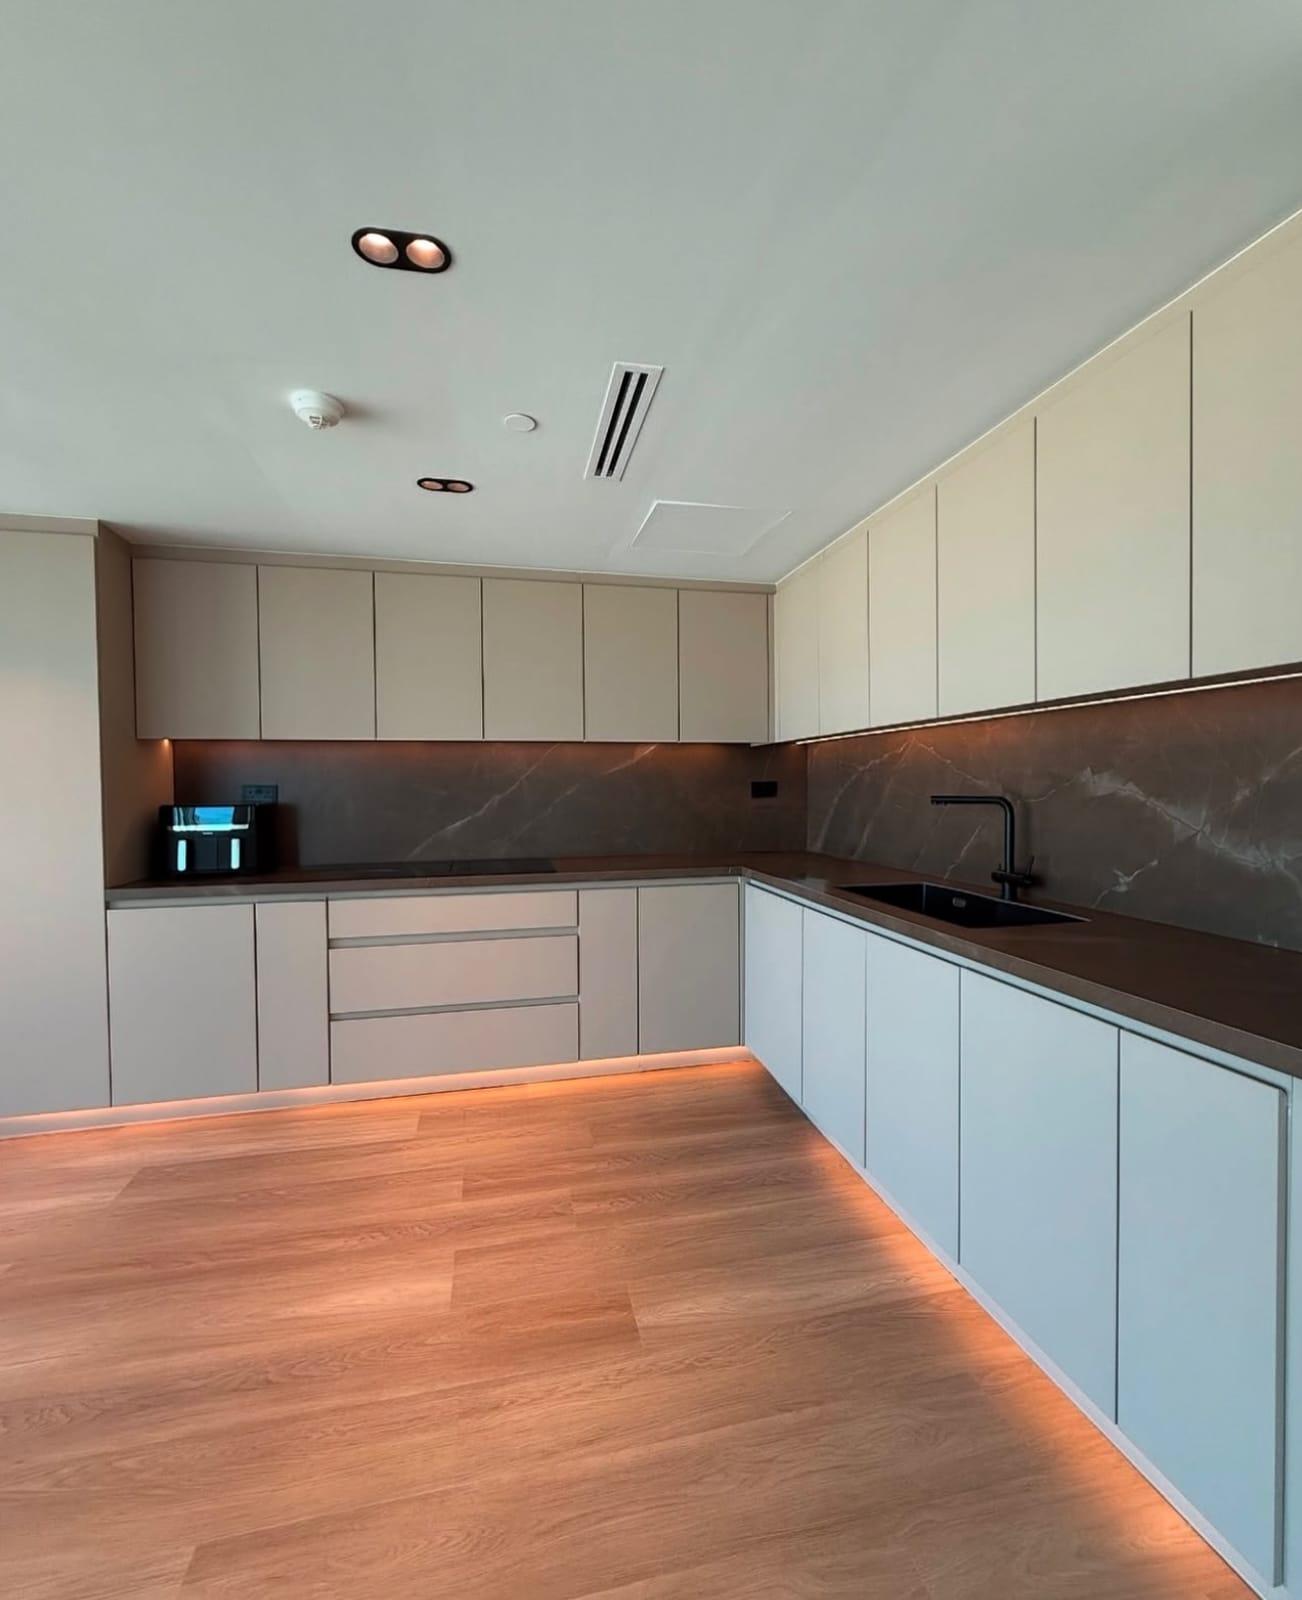
Our cabinets are built at the workshop in Sharjah, then carried to site and installed by our own crew anywhere in the UAE. Every kitchen we show is handleless, each door and drawer opened by a groove cut into its edge, and every one is L-shaped, in taupe, greige or pale grey. The worktops pictured look like stone or marble, and a strip of light runs under the top cabinets and another along the base. You can see them on the handleless kitchen cabinets page, and the wider service is described under joinery and interior fit-out.
This guide follows the order in which a kitchen is decided: the appliances and service points, the layout and the work triangle, the space beside each fixture, the boards that survive a wet room, the hardware, the worktop and sink edges, the light, and finally how the room is measured, fitted and priced. How to choose between handles and grips is covered separately in handles or handleless, so here it gets one section, not a repeat. The doors and slatted screens that sit around a kitchen have a guide of their own: interior doors and wooden partitions.
Choose the appliances and mark the service points first
A kitchen is drawn around its appliances, not the other way round. The oven bank, the hob, the sink and the fridge decide where the tall units stand, where the grip channels are cut and how wide each run is. That is why the first job is a list: the make and model of the oven, hob, hood, fridge and dishwasher, with the installation sheet for each, because the cut-out sizes, the air gaps and the power needs all come from that sheet.
Then walk the room and mark what is already fixed: the water supply and the waste, the gas point if you cook on gas, where the hood duct can leave the building, every socket, the AC grille, the window and the door. Moving any of these after the cabinets are in costs far more than moving it on paper. In a full fit-out the services go in before anything is closed over, which is the order laid out in our planning-a-fit-out guide.
Be clear, too, about who does what. Water, gas and electrical (MEP) work enter our bill of quantities as separately listed items, and whether appliances, the sink, the tap or the worktop sit inside our scope is written line by line on the quotation. At the site visit, have each one marked as ours or yours, so neither side assumes.
- Model and size of every appliance, with its installation sheet
- Positions of the water supply, the waste, the gas point and the hood duct
- Sockets and switches you want to keep, move or add
- The window, the door and any AC grille on the walls the kitchen will use
- Building rules for working hours and the lift, if the kitchen is in a tower
Pick the layout from the room: single run, galley, L, U or island
Start from the room, not from a picture: take the narrowest measurement first. A single run along one wall suits the smallest rooms, a galley two facing walls, an L-shape two walls that meet, a U-shape three walls. An island is an addition to an L or a U, and only earns its place when the floor around it stays clear.
The numbers that matter come from the NKBA, the US National Kitchen and Bath Association, whose planning guidelines are the most quoted in the trade. Their work aisle, the clear floor between the fronts of two facing runs, is 107 cm for one cook and 122 cm when two cook together. A walkway that only passes through needs 91 cm. Add the 60 cm depth of two base runs and a galley comes to about 2.3 m from wall to wall for one cook, or 2.4 m for two. Our wardrobe dimensions guide explains why 60 cm is the depth a made-to-measure run is drawn to.
Our recommendation for most UAE apartments is the L-shape. It keeps one corner for the cook, leaves the rest of the floor open for the dining table or the way through, and is the shape in all three kitchens shown on our product page. Choose a galley only when the room is a corridor, a U when the room is square and at least 2.4 m across, and an island only if the plan keeps the full aisle on every cooking side.
Kitchen layouts at a glance
Single run
- Suits
- A narrow room, a studio or a kitchenette
- The catch
- All work centres in a line, so the cook walks the length
- Number to check
- Keep landing space either side of the hob and the sink
Galley
- Suits
- A corridor-shaped room with a door at each end
- The catch
- Traffic can pass through the cooking zone
- Number to check
- Aisle 107 cm, or 122 cm for two cooks: about 2.3–2.4 m wall to wall
L-shape
- Suits
- Most apartments, and open-plan living
- The catch
- The inside corner needs a corner unit or a blind cupboard
- Number to check
- No leg of the triangle above 274 cm
U-shape
- Suits
- A square room of at least 2.4 m across
- The catch
- Three walls of doors and drawers open onto one floor
- Number to check
- Aisle 107–122 cm between each pair of facing runs
L or U with island
- Suits
- A large open-plan kitchen
- The catch
- The island eats the aisle on every side
- Number to check
- At least 107 cm where people cook, 91 cm where they only pass
NKBA guidance, converted from inches: aisle 42 in (107 cm) for one cook, 48 in (122 cm) for two, walkway 36 in (91 cm). Galley widths are our own sums with two 60 cm runs.
The work triangle: draw it, then measure it
The work triangle joins the three places a cook visits most, the sink, the hob and the fridge. NKBA's rule of thumb is that each leg should be between 122 and 274 cm, and that the three legs together should not pass 790 cm. Shorter than that and the cook is boxed in with no room to put a pan down; longer and every meal means a walk. The drawing below plays out one example, an L-shaped kitchen of 3.1 × 2.6 m, with its legs measured from the centre of one fixture to the next.
The triangle is a guide, not a law. NKBA itself treats it as a planning recommendation, and a kitchen with a tall oven bank, as in our hero photo, has more than three busy places. What does not change is the principle behind it: the places you use together should be close, and nobody should have to cross the cook's path to reach the door. In the example the way in is at the far end of the room, well away from every leg.
Try it on your own plan. Mark the centre of the sink, the hob and the fridge, join them with a pencil and measure each leg. If a leg runs over 274 cm, bring that fixture nearer; if one is under 122 cm, move the two apart or leave room for a landing between them. The video below also covers the work centres and circulation space in plain terms.
- 1. The sink sits under the window, with 61 cm of counter on one side
- 2. The hob sits on the left run, with 30 cm of counter on one side and 38 cm on the other
- 3. The fridge ends the top run, with its door handle on the side facing the sink
- 4. The counter between sink and fridge is shared, so it is 76 cm: the longer need plus 30 cm
- 5. The three legs add up to 560 cm, 230 cm inside the 790 cm limit
Landing space: where the cooking actually happens
A triangle with no counter beside its corners does not work, because a hot pan or a heavy shopping bag needs somewhere to go within one step. NKBA calls these spots landing areas and gives a minimum for each fixture. Plan them as part of the cabinet run, not as space that is left over once the units are placed.
Two rules save most mistakes. First, never put the hob at the very end of a run, because it then has counter on one side only. Second, when two landing areas sit side by side, as the sink's and the fridge's do in the drawing above, they can share the counter, but the shared stretch must be the longer of the two needs plus 30 cm, not the two added together. NKBA also asks for about 4 m of counter in all, at least 61 cm deep.
Space to leave beside each fixture
Sink
- Landing space (cm)
- 61 on one side, 46 on the other
- Also check
- A prep area of 76 × 61 cm of continuous counter next to it
Hob
- Landing space (cm)
- 30 on one side, 38 on the other
- Also check
- Never at the end of a run; the hood sits above
Fridge
- Landing space (cm)
- 38 on the handle side
- Also check
- The door opens without hitting a wall or a tall unit
Oven
- Landing space (cm)
- 38 beside it, above it or opposite
- Also check
- Opposite means no more than 122 cm away
Dishwasher
- Landing space (cm)
- At least 53 cm of standing room beside it
- Also check
- Its nearest edge within 91 cm of the sink
Two landings side by side
- Landing space (cm)
- The longer need plus 30
- Also check
- Shared counter, not two added together
NKBA guidance, converted from inches and rounded. These are recommendations for planning, not building rules.
Boards for the box and the doors in a wet room
A kitchen is the hardest room in the house for a board. The sink base takes drips from the trap and the tap, the dishwasher breathes steam when its door opens, the plinth meets the mop, and the units over the kettle and the hob live in damp, greasy air. Air conditioning dries a room in general, but none of those spots is the room in general; they are small wet corners inside a dry one.
The standard core of most cabinets, MDF, is the one to watch. A general reference such as Wikipedia notes that low-grade MDF can swell and break when it is saturated, and that unsealed MDF may expand or warp in humid conditions. For the home as a whole, the US EPA sets a ceiling of 60% relative humidity, with 30 to 50% as the comfortable band; it also says to switch on the extractor or open a window while cooking or running the dishwasher, and to get anything soaked dry inside two days. For the full comparison of MDF, plywood and particleboard, see our guide to wardrobe materials and hardware; the choices are the same boards, but a kitchen asks more of them.
Our recommendation is a moisture-resistant core for the box and the fronts, and sealed edges on every cut. Wet rooms get moisture-resistant grades of board from us, and your quotation should state which grade, rather than just writing MDF. The raw edge is where water gets in, so look hardest at the places a saw has been: the sink cut-out, the back of the sink base where the pipes pass and the bottom edge of the doors. Why humidity behaves the way it does in UAE homes is explained in our guide to wallpaper in humid climates.
Where a kitchen takes in water
Sink base
- What reaches it
- Drips from the trap and tap, splashes, a slow leak
- Ask for
- The most water-tolerant board, a sealed sink cut-out and a back with no open edge
Beside the dishwasher
- What reaches it
- Steam when the door opens at the end of a cycle
- Ask for
- A steam strip under the worktop above and sealed side panels
Plinth
- What reaches it
- Mop water at floor level
- Ask for
- A sealed or profile plinth lifted off the floor, not raw board
Units over the kettle and the hob
- What reaches it
- Steam and grease
- Ask for
- Sealed edges, fronts that wipe clean and a hood sized to the hob
Wall on the outside
- What reaches it
- Condensation where cold air meets a warm room
- Ask for
- A small air gap behind the units, and no raw board pressed to the wall
Our own checklist, built on the EPA's moisture advice. Put the board and the edge treatment on each BOQ line so two quotes can be compared fairly.
Handleless fronts, soft-close and the hardware that does the work
With a handleless front the door is opened by a groove along its edge, so the fronts form one flat surface and a sleeve cannot catch on a handle in a tight kitchen. They are quick to wipe, though grease can settle in the groove, so run a damp cloth along it each week. A grooved edge is the plain, durable choice. Push-to-open gives a still cleaner face but fits a catch to every single door; the options are compared in our guide to handles or handleless.
Hardware decides how the kitchen feels on the thousandth use. We fit soft-close hinges and drawers from established makers, and you should ask for the make and the load class in writing. Two published figures help. Blum, a leading maker of hinges and drawer systems, advises two hinges for a door of 4 to 6 kg and three for 6 to 12 kg, up to 600 mm wide, with one more hinge for doors up to 650 mm; a tall, narrow pantry door does better with three. Its TANDEMBOX drawers come in 30 kg and 65 kg load classes, so choose the 65 kg class for pans and crockery and the lighter one for cutlery.
In a family kitchen, fit soft-close throughout: it ends the slamming that slowly loosens hinges. If a door starts to bind, report it early: our workmanship warranty is 24 months, and a small adjustment is better than forcing it. The video below weighs up handleless kitchens, the pros and the cons, before you commit to one.
Worktops, splashbacks and the sink unit
In our photos the stone-look worktop and the splashback match and run up to the underside of the wall units. That is a good rule: a splashback that stops short leaves a joint at the height splashes land, and one continuous surface means fewer joints to seal. Dark tops hide marks; light ones lift a kitchen that gets little daylight.
The sink unit is where the box and the top meet water. Ask for the edge of the worktop cut-out to be sealed, for the joint where the top meets the splashback to be closed with a flexible sealant, and for standing water to be wiped off the edges and around the sink rather than left to work into the joints. These are habits as much as specifications, and they decide whether the sink base looks the same in five years.
In most kitchens the sequence matters: the base units are fixed and levelled first, the worktop is templated from them, and only then cut and set. Because that depends on who supplies the top, the BOQ should say if the worktop and splashback are ours to supply or yours, and who installs them. See the Sharjah joinery page for how we work locally.
Lighting a kitchen: under the wall units, the plinth and the ceiling
Our kitchens carry light in three places. A strip under the wall units puts light on the worktop where you chop and read a recipe, a lit plinth makes the floor glow and shows the way at night, and the ceiling, with downlights, slot diffusers and sometimes a cove, takes care of the general light. Each should be on its own switch, so the plinth can stay on as a night light while the rest is off.
Fix the strip toward the front edge of the wall unit so the light reaches the full depth of the worktop, and choose neutral white for the work zones: it shows food and cleaning more truthfully than warm white, which suits a dining corner better. The same sensor strips and hidden drivers we use in wardrobes are explained in our wardrobe lighting guide, and the ceiling options in gypsum ceiling lighting basics.
The wiring belongs to the joinery. We plan the light into the cabinets on the very first drawing and our own team does the wiring, so the groove for the strip, the route for the cable, the hidden driver and the switch are decided together. If the ceiling is also being built, the gypsum ceiling service lets the cove and the downlights be drawn with the kitchen.
Measuring, drawing and fitting: the order of work
It starts with a free site visit, where we laser-measure the room, note the services and the walls the kitchen will use and talk through the appliances. Next comes a set of elevations, one per wall, with the units, fronts, lights and grips marked; nothing is cut until you have approved them. Finishes are checked against samples in your own light before they are cut, and IKEA's UAE kitchen guide starts in the same place: accurate measurements are the foundation of all planning.
After approval the boards are cut and edged at the workshop, sprayed or laminated, and brought to site for our installers to fix. We agree the timetable together with the quotation, since a kitchen waits on the other trades in the room as much as on our own bench. If you are living in the home while the work goes on, preparing an occupied home explains how to protect floors and keep a path clear.
On handover day we tune the doors and drawers and go over the finish together. The kitchen cabinets and fittings are one of the items in our fit-out handover checklist; bring it along.
From first visit to a working kitchen
Site visit
- What happens
- Laser measurement, services noted, appliances discussed
- What you decide
- The appliance list and anything that must move
Drawing
- What happens
- Every wall drawn with units, fronts, lights and grips
- What you decide
- Layout, front finish and the grip or push choice
Quotation
- What happens
- A line-by-line itemised BOQ
- What you decide
- What is in our scope and what you supply
Workshop
- What happens
- Boards cut, edged and finished at our bench in Sharjah
- What you decide
- Sign-off on samples
Installation
- What happens
- Units fixed and levelled, lights wired
- What you decide
- Access, protection of floors, building rules
Handover
- What happens
- Doors and drawers adjusted, finish checked
- What you decide
- Anything to put right, listed on the day
The timetable is fixed with the quotation after the visit; the 24-month written workmanship warranty runs from handover.
What a kitchen BOQ lists, and what moves the price
We price kitchens as an itemised bill of quantities after the site visit, not from a list, because no two rooms are the same. Each unit, front, drawer, light and trade is listed on its own row, which lets you see the cost of every decision and swap one for another. Reading one is covered in our BOQ and budget guide, and why area and finish drive a price in custom closet and wardrobe prices.
Six things move a kitchen's price most: the length of cabinet run, the number of tall units, the share of drawers against doors, the board and the face finish, the class of hardware and the lighting. Then come the items that can sit on either side of the scope line: the worktop, the splashback, the sink and tap, the appliances and the water, gas and electrical work. Two quotes can only be compared when both list the same ones.
Our work, meaning what we build and install, carries a written 24-month workmanship warranty, while hardware and appliances bought in are under the terms of whoever made them. To see how a kitchen sits in a whole-home budget, look at our residential fit-out service and the pricing guide. Run the approved drawing past this list before you sign:
- Every appliance is named, with its size, and the cut-outs match its installation sheet.
- The aisle is at least 107 cm where people cook and 91 cm where they only pass.
- No leg of the work triangle is over 274 cm or under 122 cm.
- Each fixture has its landing space, and no hob sits at the end of a run.
- The BOQ names the board grade and the edge treatment, especially at the sink.
- The worktop, splashback, sink and appliances are marked as in or out of our scope.
- Lights have their own switches, and the driver can be reached.
Common questions
What is the kitchen work triangle?
It joins the sink, the hob and the fridge. Each leg should be between 122 and 274 cm and the three together no more than 790 cm. Handleless kitchens from our workshop.
How wide should the walkway in a kitchen be?
Leave 107 cm of clear floor where one person cooks and 122 cm for two; a walkway that only passes through needs 91 cm. Joinery and fit-out.
What is the best material for kitchen cabinets in the UAE?
A moisture-resistant core for the box and the fronts, with every cut edge sealed, and the most water-tolerant board in the sink base. Ask for the grade by name. Wardrobe materials and hardware.
Are handleless kitchen cabinets practical?
Yes. The fronts wipe clean and nothing snags, but grease collects in a grip channel, so wipe it weekly. Push-to-open adds a catch to every door. Handles or handleless.
How much do custom kitchen cabinets cost in the UAE?
We price kitchens as an itemised BOQ after the site visit, so every unit, finish and trade has its own line. Read one before you compare. BOQ and budget guide.
Do you supply the appliances, worktop and plumbing?
The quotation says, line by line; water, gas and electrical work enter it as separate items. Have each one marked as ours or yours at the visit. Residential interior fit-out.
How many days does a custom kitchen take?
We set the timetable with the quotation after the site visit, since it depends on the other trades working in the room. Planning a fit-out.

Sources & specifications
Manufacturer information applies to the named products and systems. Sources reviewed on 28 October 2026.
- NKBA kitchen planning guidelines, as summarised by CRD Design Build: work triangle 4–9 ft per leg and 26 ft in all, work aisle 42 and 48 in, walkway 36 in, landing areascrddesignbuild.com(opens in a new tab)
- NKBA: Kitchen Planning Guidelines (the published guidelines document)kb.nkba.org(opens in a new tab)
- Blum, hinge quantities for a given door weight and widthea.blum.com(opens in a new tab)
- Blum: TANDEMBOX drawer system, load classes of 30 kg and 65 kgblum.com(opens in a new tab)
- US Environmental Protection Agency, guidance on moisture in the home: relative humidity ceiling, extractor use while cooking, drying wet materials quicklyepa.gov(opens in a new tab)
- Medium-density fibreboard: swelling when saturated and warping when unsealed (Wikipedia)en.wikipedia.org(opens in a new tab)
- IKEA UAE: how to buy a kitchen in five steps (accurate measuring as the base of all planning)ikea.com(opens in a new tab)
Want this planned for your home?
Consultation and measurement are free. Tell us the rooms, location and what you need; we arrange a sample visit and define the measured quotation.