Media Walls · 22 min read · 21 October 2026
Media wall sample boards: what to look at before you say yes
How to read a media wall sample board properly: its four faces, sheen at an angle, why size hides repeats and joins, light and colour mismatch, codes to write down, and a ten-minute routine for the visit.

By Ali Haider Basra, Founder, Al Tareeq Decor · Contact our workshop
Key takeaways
- A sample board is evidence about a surface, not a picture of your wall: read four faces of it (front, core at the cut, edge and back).
- Tilt it. Sheen only shows when you change the angle, and a gloss finish throws a bright patch back at the seat opposite it.
- A sample cannot show pattern repeat, joins or board-to-board tone, so settle those on the drawing, with the joint lines marked.
- Two samples that match on a table can disagree on the wall; compare them in the room's daylight and in its evening light.
- Approve a finish by code, sheen and board, keep the sample, and compare it with the delivered boards on installation day.
On this page
- Key takeaways
- What a sample board is, and what it is not
- The four faces of a sample: front, core, edge and back
- Reading the face: colour, texture and the scratch you can feel
- Sheen, gloss and the angle you stand at
- Why a sample's size matters more than people think
- Two samples that match on the table and disagree on the wall
- Batch, stock and the difference between the sample and the board
- Codes, names and the line on the drawing
- What to write down for each sample
- Edges, handles and the parts that touch the hand
- Marble-effect, fluted and textured samples: extra checks
- A short routine for the visit
- Common mistakes with sample boards
- How we handle samples and what happens next
- Your WhatsApp step: what to send
- Common questions
What a sample board is, and what it is not
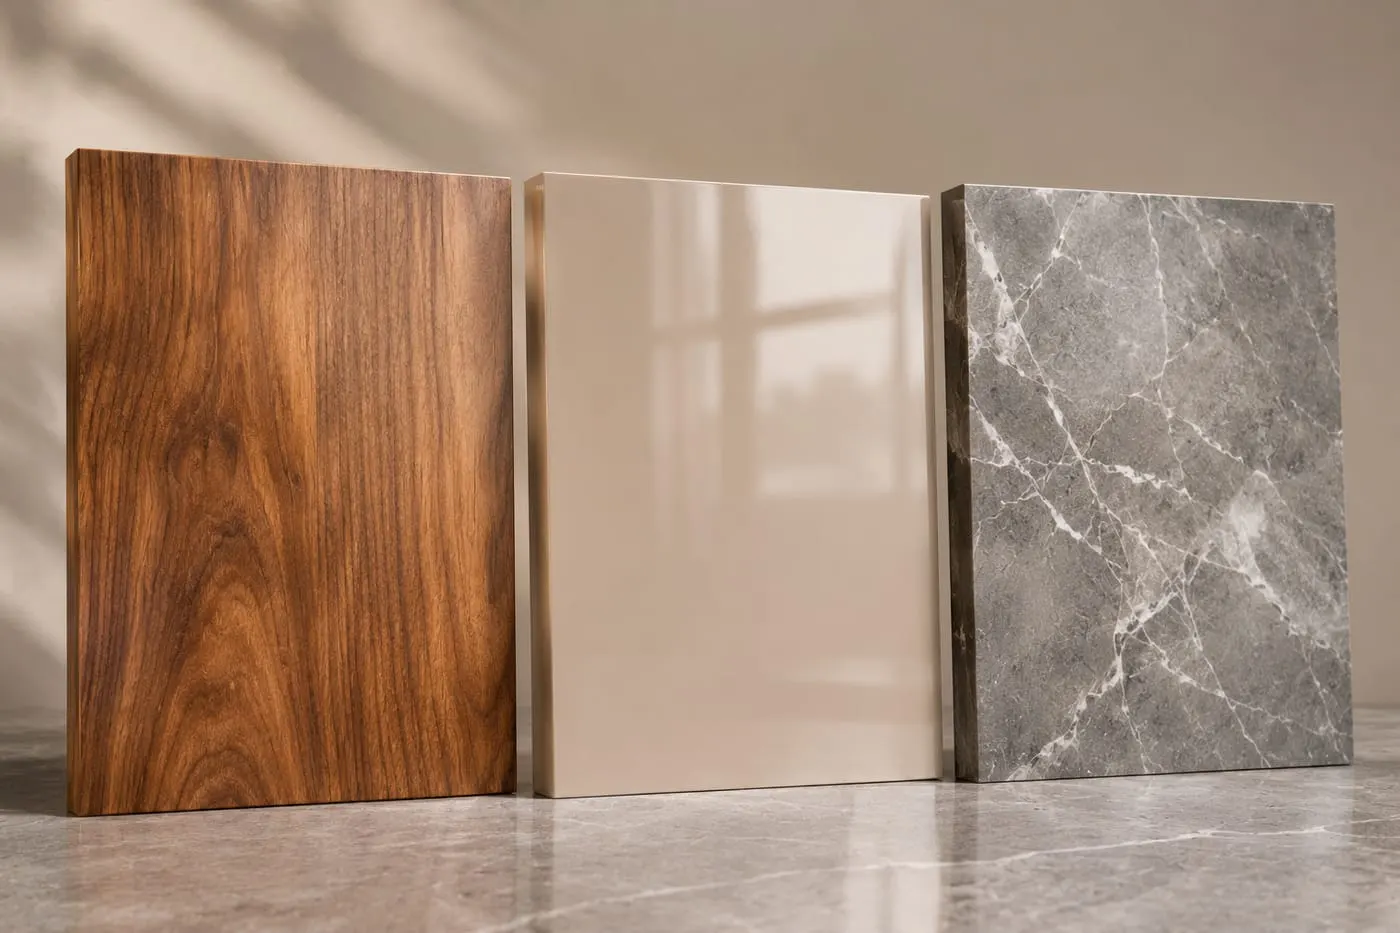
A media wall sample board is a small cut piece of the surface your wall will be made from: a square of laminate bonded to a board, a strip of real-wood veneer, a sprayed colour card, a slice of stone-effect panel. You are asked to look at it and say yes, and that single yes later decides how a wall several metres wide looks every evening for years. It deserves more than a glance.
The first thing to understand is that a sample is evidence about a surface, not a picture of your wall. It can tell you a lot about colour, texture, sheen, thickness and how the edge is finished. It cannot tell you where the boards will join, how a pattern repeats across 3.6 metres, how the wall will look beside your floor, or how it will behave with the LED strip you chose. Those answers come from the drawing and from the way you approve the finish in your own room.
This guide is about the object in your hand. It walks through the four things worth reading on any sample board, the limits of its size, why two samples that match on a table can disagree on the wall, how to hold a sheen question to the light, and what to ask to be written down. If you have not yet decided between laminate, lacquer and veneer, start with the colour and finish guide and come back with two or three candidates.
At Al Tareeq Decor the free measuring visit brings physical samples to your home, so you will be holding them next to your real wall. Everything below is a way to make those ten minutes count. If you want to prepare before the visit, what the visit covers is worth a read first.
The four faces of a sample: front, core, edge and back
Most people look at the front of a sample and stop. The front is the part the supplier has worked hardest on, so it is rarely where the surprise is. Turn the board over and look at all four surfaces before you form a view.
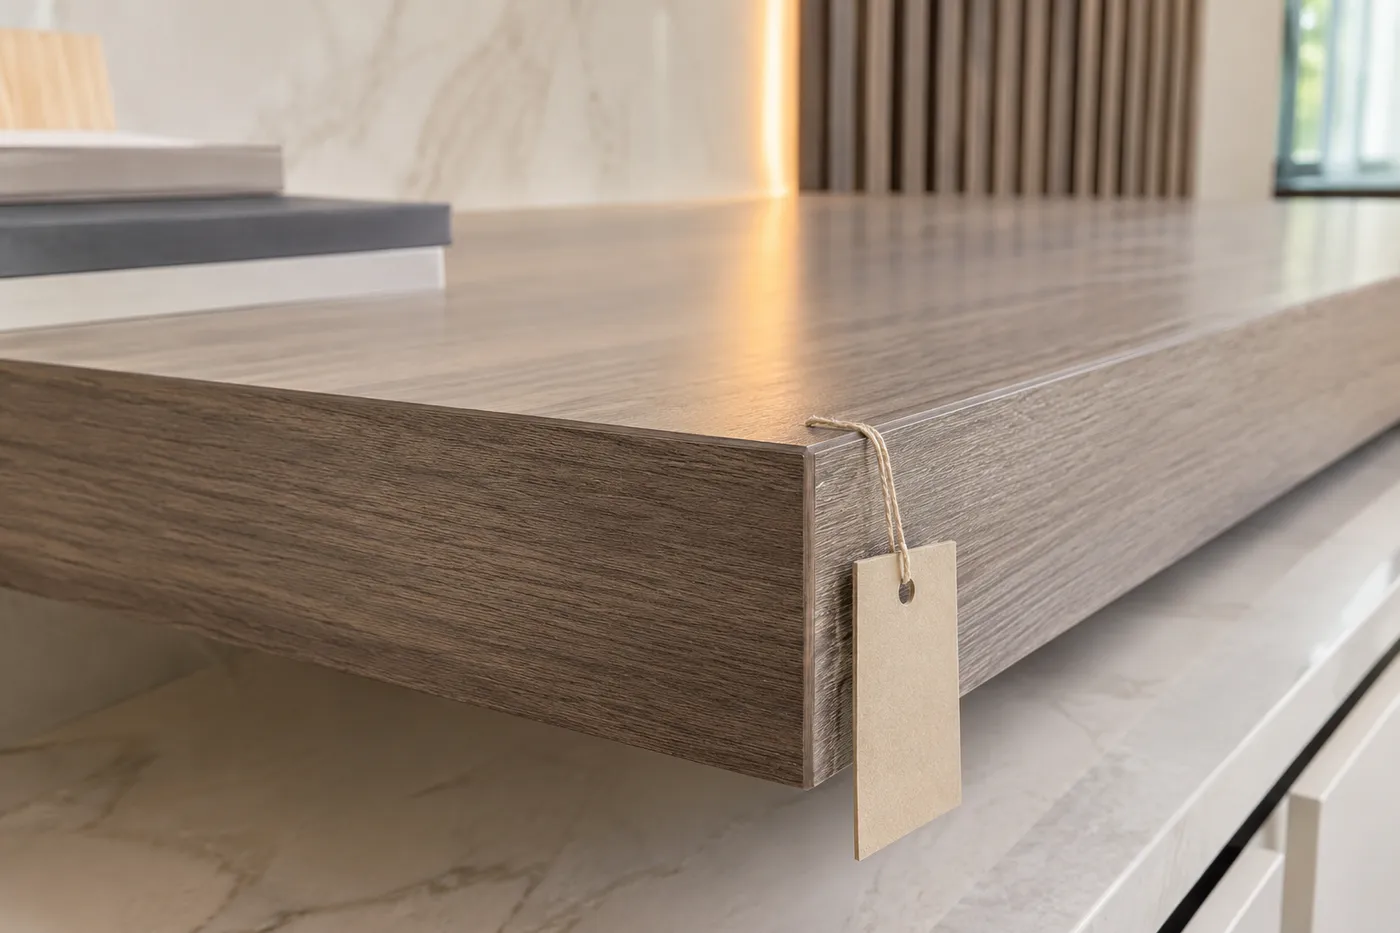
The front is the decorative face: colour, grain print or real veneer, texture, sheen. This is what you will see from the sofa. The core is what shows where the board is cut: a layer of engineered board, usually pale brown, with a texture that tells you something about its density. The edge is the narrow side, which may be covered with a strip, painted, or left raw. The back is the reverse face, which ought to be a considered part of the build rather than an afterthought.
In a high-pressure laminate, the stack on the front is a set of thin papers pressed together: a clear overlay paper that helps with abrasion and scratching, a printed decor paper that carries the colour or the wood pattern, and layers of kraft paper that form the core of the sheet. That layering is described in [the general reference on decorative laminate](https://en.wikipedia.org/wiki/Decorative_laminate), which also notes that the overlay protects against wear, scratches and heat while the printed decor paper sets the pattern. The point for you is practical: a laminate's colour lives in a thin printed layer, so a deep scratch or a chip at a corner can show a different colour underneath, and you should look at the corners of a sample for exactly that.
A veneer sample behaves differently. Veneer is real wood sliced very thin and glued over a core panel, and [the reference page on wood veneer](https://en.wikipedia.org/wiki/Wood_veneer) says it can be cut very thin and is typically glued onto a core of wood, particle board or MDF. Because a slice is real wood, two pieces from the same species will not look identical. That is the charm of veneer and also the reason to look at more than one piece of it.
The diagram below shows a sample in section with four things to read, numbered from the face down to the back.
- 1. Face and sheen: colour, texture and how shiny the surface is when you tilt it.
- 2. Core at the cut: the colour and density of the board under the surface.
- 3. Edge treatment: the strip or finish on the narrow side, and the line where it joins the face.
- 4. Back face: what is on the reverse, and whether it looks like a planned part of the build.
Reading the face: colour, texture and the scratch you can feel
Start with the face, but use more than your eyes. Run a fingertip across it slowly in two directions. A good wood-effect laminate should feel the way its print looks: if the grain is printed to look deep and the surface under your finger is dead flat, that is a design choice, and a different one from a surface that is pressed with a texture that follows the grain. Neither is wrong, but they photograph and age differently, and you should know which you are choosing.
Next look at texture from the side. Stretch your arm out and tilt the piece until the light skims along the surface. This raking angle shows every ripple, orange-peel texture or tool mark that straight-on light hides. Do it on the sample so you know what the surface is; you do not want to discover it for the first time on a finished wall in the evening, when a strip of LED light throws a long low beam along it.
Check how the sample treats a mark. Press a fingernail gently where nobody will see and see whether the surface holds. Do not scratch hard or try to damage it; the point is to see whether the sample feels like a hard, sealed surface or a soft one that takes a print from a nail. Ask the person who brought the sample how this finish is cleaned. For laminate and sprayed colour the answer is usually a damp soft cloth; for veneer the answer is usually different, and you should hear it before you choose, not after. The longer story is in our guide to what the finish needs after handover.
Finally, look at the corners of the sample. A fresh corner shows how the surface behaves where it is most likely to be knocked: whether the printed layer lifts, whether the core shows, whether the edge strip stands proud. A sample is cut in a clean workshop and handled carefully, so if the corner already looks tired, treat that as a warning about knocks and household life.
Sheen, gloss and the angle you stand at
Sheen is the most misread property of a sample. A matt sample and a gloss sample look alike when you view them straight on, then separate sharply when you tilt them. The reason is geometry: gloss is how strongly a surface reflects light in the mirror direction, and measuring it properly requires choosing an angle. [The optics reference on gloss](https://en.wikipedia.org/wiki/Gloss_(optics)) explains that the common standard measures specular gloss at 60 degrees, with later editions adding 20 degrees for very glossy surfaces and 85 degrees for matt ones, and that gloss depends on the angle of the light and on the texture of the surface.
You do not need a meter to use that idea. A gloss surface throws a bright patch of whatever sits opposite it, and where that patch falls depends on where you sit and where the light is. A matt surface scatters the light, so no patch appears. The three-column diagram shows the same sample with the light skimming the surface, at a middle angle, and straight on.
What to do with this: put the sample where the real wall will be, then tilt it towards the window and towards the lamp you use in the evening, and watch for the bright patch. If the patch lands where your eyes will be from the sofa, the finish will give you glare on that wall. A satin or matt option may be a better choice than gloss for a wall that faces a window or sits under spotlights. A deep gloss is not a mistake; it is a choice that asks for a careful light plan, which is what the lighting guide is for.
Why a sample's size matters more than people think
A sample is small, and small is a problem for three reasons that only appear once the wall is built.
The first is pattern repeat. A wood-effect laminate or a marble-effect panel carries a print, and the print repeats after some distance. In a hand-sized piece you see a small part of one print; on a wall you see that part repeated many times, and the repeat may be obvious or invisible depending on the pattern. Ask whether the pattern has a repeat and how long it is. If the answer is that it repeats every board, make sure you are happy to see the same figure side by side.
The second is the join. A wall is made of several boards and the finish has to meet itself at each seam. A sample cannot show how that seam looks, whether the grain continues across it or whether the colour of one board sits a shade apart from the next. That is a drawing and a workshop question, and the place to settle it is the elevation, with the joint lines drawn on it. For a tall wall, our full-height villa wall guide goes into where joints should land.
The third is scale. A colour in a small square reads lighter and tidier than the same colour over a wall, because the eye sees colour as a field, not a patch. A deep charcoal that looks elegant at 30 centimetres can read heavy over several metres, and a pale oak that looks fresh can look washed out. Whenever you can, ask to see the sample against a larger piece of the same finish, or look at a finished wall in the same colour. Our project photos in the media wall design ideas guide are a good second opinion.
The animated diagram puts these three limits side by side against a wall drawn to scale. The ratio is illustrative, but the lesson holds for every sample: it is one piece of a large surface.
Two samples that match on the table and disagree on the wall
You may have noticed this with paint: two colours that look the same in the shop look different at home. The cause is called metamerism. [The colour reference on metamerism](https://en.wikipedia.org/wiki/Metamerism_(color)) describes it as two materials that match under one light but not under another, and gives the example of colours matched under cool white fluorescent light that lose the match under daylight or tungsten light. It is not a defect of either material; it is how colour perception works.
For a media wall the lesson is concrete. If you are comparing a laminate sample with a lacquer sample, or a sample from one board range with one from another, do not conclude they match because they match under the lamp on a showroom table. Look at them together at the wall, in the light of the room, and again after dark. A pair that agrees in all three lights is safe; a pair that agrees in one is a pair to avoid putting next to each other on the same wall.
The light source itself matters. A light's colour rendering index is a measure of how faithfully it shows the colours of objects compared with a reference light. [The reference on the colour rendering index](https://en.wikipedia.org/wiki/Color_rendering_index) explains that the index does not describe the apparent colour of the light itself, only how well it renders object colours, and that ordinary white LED lamps usually reach a score of 80 or above. In practice: if you are choosing a finish for a wall you will light with LED, look at the sample under the same kind of light, not only under the showroom's. Our team plans the warm or neutral LED temperature together with the finish, and the lighting ideas guide covers the layers.
A simple habit helps: take your own phone photo of every sample in place, once in daylight and once at night with the lights you use. Screens distort colour too, so do not choose from the photo, but use it to remember which sample was which and what you saw. When you stand in the same spot a day later, the photos tell you whether your first impression was the light or the board.
Batch, stock and the difference between the sample and the board
Another gap sits between a sample and the boards that will be cut for your wall: both come from stock, and stock varies. Laminate is printed in production runs, veneer comes from trees and lacquer is mixed in batches. For a plain colour the variation is usually small and a good workshop manages it by cutting all the visible faces from the same lot. For a real-wood veneer, where each leaf is different, there is a deliberate choice to make about matching: do you want the grain to flow from one board to the next, or do you want each board to read as its own piece?
Raise this with the team at the visit. Ask three things. Will the visible faces of my wall be cut from the same production lot as the sample? Where there is real wood, how will the leaves be matched across joins? What happens if a board has to be replaced later, and how closely will the new one match? The honest answer to the last question is that a later replacement may sit a shade apart from an older board because the surface will have aged, and a team that says so is being straight with you.
If a wall will be made in two stages, for example a tall unit now and a second one next year, say that early. A sample approved today for work next year is a weak record, because the stock may change and the first piece will have mellowed. Our guide to adding to an existing wall explains matching new sections to old finishes and is worth reading before you commit to a staged plan.
None of this is a reason to be nervous. It is a reason to keep the sample. Ask to keep the approved piece, mark it with the date and the wall it belongs to, and store it flat in a drawer away from sunlight. A sample you can put next to a delivered board on installation day is the best acceptance tool you have.
Codes, names and the line on the drawing
A sample is only useful as an approval if the finish can be named. Every sample should come with a product name, a decor or colour code, and a statement of what it is made of. If the person showing it cannot tell you the code, write down what you can and ask for it by message afterwards; a drawing that says "oak" is not an approval, and "oak-effect laminate, code as on the sample, matt" is.
Then compare what is written with what is on the sample. Check the sheen is stated (matt, satin, gloss), the texture is stated if it is anything other than smooth, and the board the finish sits on is named. The material list in the media wall quotation checklist shows what a good quotation names, and the materials and cost guide explains why each of those lines changes the price.
One more habit is to number your candidates. Write A, B and C on the back of the samples in pencil and use the same letters in photos and messages. It stops the classic mistake of approving "the second one" when the other person is thinking of a different second one. When you have decided, the final line to send is short: the letter, the code and the wall it is for.
What to write down for each sample
Name and code
- What to record
- Product name and decor or colour code
- Why it matters
- Lets the workshop order exactly this surface
Material
- What to record
- Laminate, lacquer, veneer or panel, and the board under it
- Why it matters
- Different materials age and clean differently
Sheen
- What to record
- Matt, satin or gloss
- Why it matters
- Decides glare and how fingerprints show
Texture
- What to record
- Smooth, wood-grain, stone-effect or fluted
- Why it matters
- Changes how light skims the wall
Edge
- What to record
- How the narrow side is finished
- Why it matters
- Edges are touched and seen up close
Where it goes
- What to record
- Panel, console, doors, shelves
- Why it matters
- Not every part needs the same surface
Photograph the sample with a note beside it, and keep the message thread with the team as your record.
Edges, handles and the parts that touch the hand
The front of a media wall is mostly looked at. The parts that are touched are the door and drawer edges, the handles or push-to-open lines, the console top and the shelf fronts. These are the surfaces that wear first and look closest. A sample that shows you only a flat face is not showing you these.
Ask for an edge sample. It does not have to be the same size as the face sample; a small offcut of the same board with the same edge treatment is enough. Run your finger along it and look at the join line between the face and the edge. If the strip is a different colour from the face, check whether you are comfortable with that line at eye height on a shelf front. If you want to go deeper on how edges are banded and sealed on a media wall, the dedicated guide is edge banding and sealing for media walls.
Handles and push-to-open details change how a front looks and how much it is touched. A handleless front needs a finger line or a push-to-open mechanism, and the edge there is often the busiest in the whole wall. Look at the sample's edge as if a hand will be on it daily, because it will. On a family wall, our team can suggest where a rounded edge or a more forgiving surface makes sense, and the guide for a second living room used by children shows how that thinking works in practice.
A last item is hardware. Hinges and runners are not part of the finish sample, but they are part of what you touch. The product page for TV wall units and floating consoles lists what the console includes, and the selected hinge and drawer hardware should be specified in the quotation. Ask to see the hinge in the quotation if you want to know it.
Marble-effect, fluted and textured samples: extra checks
Some finishes need more than the standard look. Stone-effect and marble-effect panels are judged by veining, and a sample shows one small area of a pattern that is spread across large sheets. Ask whether the panel pattern continues across joins, and look at the sample's veining at a distance rather than close-up. Our marble TV wall options guide and the longer marble-effect TV wall guide cover the material routes.
Fluted and slatted finishes are judged by profile, spacing and how the light falls into the grooves. A short sample cannot show a run of twenty slats, so ask what the profile width and the spacing are and look at a photograph of a finished wall with the same profile. The fluted and slatted guide and the panel guide for fluted TV wall panels explain the choices, and a sample of a slat shows you the surface and the edge but not the rhythm.
Dark finishes need a second look. A charcoal or black sample hides some of its texture in a lit showroom and shows fingerprints in a dim one. Hold it to the light and press a clean fingertip on it, then see how long the mark takes to fade. It is a harmless test that tells you whether the surface will need frequent wiping.
For a wall with an electric fireplace, remember the sample cannot show how the finish sits beside the glass front and the flame effect. That is what the electric fireplace guide is for; take the sample to the drawing and compare it with the fireplace panel colour.
A short routine for the visit
Here is a routine that takes ten minutes and covers everything above. It works at the free measuring visit or when you are looking at samples at home.
First, choose two or three candidates before the day, not twenty. Our team brings samples, but you will decide faster if you have looked at photographs beforehand, for example in our design ideas. Second, put each sample against the real wall and step back to the sofa. Third, tilt each one towards the window and the lamp. Fourth, turn it over and read the edge, the core and the back. Fifth, ask for the code, the sheen and the board it sits on. Sixth, photograph them in place with the letters visible. Seventh, come back to them in the evening light.
The diagram turns that routine into four questions you can answer yes or no to. If any answer is no, there is a small fix next to it. It is the shortest honest path to a finish you will still like in a year.
Common mistakes with sample boards
Eight slips come up again and again, and each has a plain fix.
Every one of them is cheap to avoid before production and expensive to correct after it. A media wall is made to measure in our Sharjah workshop, so a changed finish after production starts means making boards again. The safest moment to be picky is now.
- Choosing from a photo on a phone. Screens change colour; use the photo as a memory aid only.
- Approving a sample seen only in the showroom light. Look at it at the wall, in the evening as well as the day.
- Looking at the face and not the edge. The edge is what you touch daily.
- Treating two samples as a match because they match on a table. Metamerism means they may not match on the wall.
- Forgetting the second material. If the wall has a console, shelves and panels, ask whether each uses the same surface.
- Not keeping the sample. Keep it, label it and compare it with the delivered boards on installation day.
- Approving without a code. A name such as "oak" is not a specification.
- Rushing because the price is waiting. Approve the finish before comparing the final price, as the planning guide recommends.
How we handle samples and what happens next
Our approach is simple. The free measuring visit brings physical samples and a laser measure to your home anywhere in the UAE, and our team talks through the finishes with you in your own light. After the visit we send a drawing and an itemised quotation, and the wall is made in our Sharjah workshop once the drawing is approved and the 60% advance is paid. Time depends on size and design, and the wall is usually ready in up to about 10 days. A media wall from us starts from AED 3,500 per project for a compact panel with a floating console in standard laminate; wall size, finish, marble-effect panels, lighting and a fireplace set the final figure, as the price guide and the price factors guide explain.
On warranty, the boards carry a 5-year limited warranty on the wood-based boards only, subject to the written terms; hinges, runners, labour and misuse are excluded. Our workmanship carries a separate 24-month written warranty. Neither one is a promise about how a finish will look beside another finish, which is why the sample decision is yours to make while you are holding the piece.
If you live in Sharjah or Dubai, the local pages show the service in your area: media walls in Sharjah and media walls in Dubai. For a wider picture of the service, the media walls category lists the work and the finishes.
Your WhatsApp step: what to send
Starting is easy: open WhatsApp and send us a photo of the wall that will carry the TV, taken straight on and from the sofa, the TV size you have in mind and the room it is in. If you already like a finish, send a photo of it or its name, and tell us whether the wall faces a window. We will reply with what to prepare for the visit and arrange samples for you to hold against your wall.
What to send for a media wall consultation lists everything that helps, including the photos that save a second visit. A few minutes with a good photo is often enough to narrow twenty samples to three.
Common questions
What should I look at on a media wall sample board?
Read four things: the front colour, texture and sheen, the core where the board is cut, the edge treatment and the back. Tilt it to the light and hold it against your real wall. Choosing and approving finish samples.
Can I rely on a small sample to choose a whole wall?
Only for the surface. It cannot show how a pattern repeats, where boards join or how tone varies between boards, so confirm those on the drawing. Media wall colour and finish.
Why does a sample look different at home than in the showroom?
The light is different, and two materials that match under one light can fail to match under another. Look at the sample in daylight and under your evening lamps. Media wall lighting ideas.
Should I ask to see the edge of the board?
Yes. The edge and the corner are touched daily and show how the finish is built. Ask for an offcut with the same edge treatment. Edge banding and sealing.
Is matt or gloss better for a media wall?
Matt and satin hide glare and marks better on a wall that faces a window or sits under spotlights. Gloss can look rich but needs a careful light plan. Wardrobe matt vs gloss doors explains the same sheen trade-off.
Do you bring samples to my home?
Yes, the free measuring visit brings physical samples and a laser measure to your home anywhere in the UAE. What the measuring visit covers.
What does a media wall start from?
From AED 3,500 per project for a compact panel with a floating console in standard laminate; size, finish, lighting and a fireplace set the final figure. What a media wall costs.

Sources & specifications
Manufacturer information applies to the named products and systems. Sources reviewed on 11 November 2026.
- Decorative laminate (layers: overlay, decor paper, kraft core)en.wikipedia.org(opens in a new tab)
- Metamerism (color): why samples that match in one light can differ in anotheren.wikipedia.org(opens in a new tab)
- Gloss (optics): specular gloss angles and surface textureen.wikipedia.org(opens in a new tab)
- Color rendering index: how faithfully a light source renders coloursen.wikipedia.org(opens in a new tab)
- Wood veneer: thin slices glued onto a core panelen.wikipedia.org(opens in a new tab)
Want this planned for your home?
Consultation and measurement are free. Tell us the rooms, location and what you need; we arrange a sample visit and define the measured quotation.